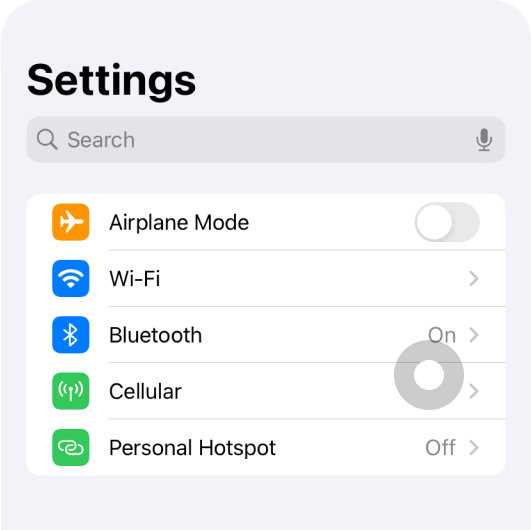


Open Cellular
Settings → Cellular / Mobile Data

설치 및 사용 가이드
QR 코드부터 연결 확인까지, 기기별로 단계대로 진행하세요.
Connect to stable Wi-Fi, check when the plan starts, then install the eSIM.
Use the travel eSIM for data, turn on its roaming, then verify the connection.
When the plan starts counting is based on your order rules. Installing the eSIM does not always mean billing has started or that you are already online.
On this page01 Get install details02 Install the eSIM03 Connect after arrival04 FAQ
Find the QR code for this plan, plus any manual install details. Check destination, plan, and device before you install.
Check spam and the email used at checkout. If you still cannot find it, contact AirZlink support.
iOS 17.4 or later: in Mail or a browser, press and hold the QR code and choose Add eSIM if available. You can also show the code on another screen, or use manual install.
Illustration only · use the email or App order as the source of truth
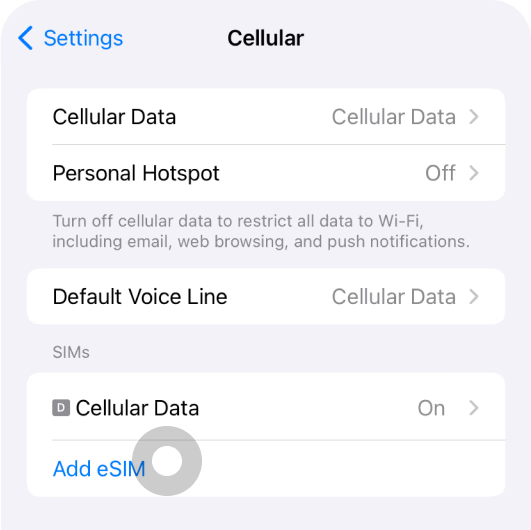
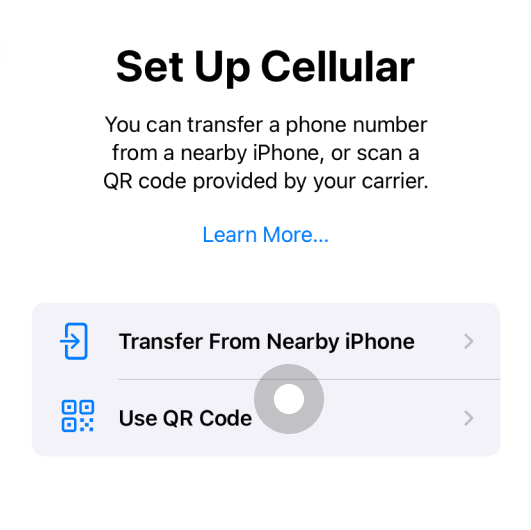
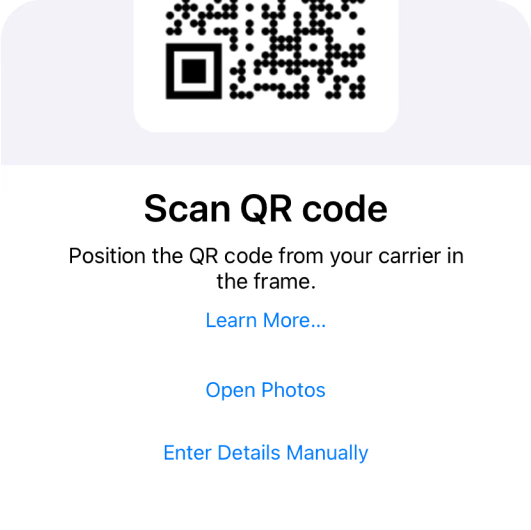
These steps use a QR code. Menu names may change with the OS version. Screenshots are in English — follow the highlighted spots.
Settings → Cellular / Mobile Data

On the Cellular screen, tap Add eSIM

Choose Use QR Code to open the scanner

Scan the QR code in your email or order

After scanning, follow the system prompts. Stay online until it finishes, then check that a new eSIM appears in the list.
Keep following the prompts until the system finishes. Do not go offline or delete the eSIM while it downloads.

Tap Continue and finish the system steps. iOS · actual menus may vary
Select the new eSIM in Cellular and rename the label to AirZlink Travel so it is easy to tell from your primary line.

Name the travel line AirZlink Travel. iOS · actual menus may vary
Settings → Cellular → Add eSIM → Use QR Code → Enter Details Manually. Copy the SM-DP+ address and activation code from your order or email. Fields in the screenshot are left blank on purpose.

Copy install details from your order. iOS · actual menus may vary
Make sure you are in a covered destination and the plan still has data and validity. “AirZlink Travel” means the travel eSIM you just installed.
Settings → Cellular → AirZlink Travel → Turn On This Line.

Turn On This Line. iOS
Settings → Cellular → Cellular Data → choose AirZlink Travel.

Set Cellular Data to AirZlink Travel. iOS
Open the AirZlink Travel settings and turn on Data Roaming.

Keep Data Roaming on for the travel line. iOS
Wait for the phone to register on a local network, check for 4G / LTE / 5G, then open a webpage or map to confirm data works.
You can keep calls and SMS on your primary line. Confirm voice/SMS roaming fees with that carrier.

Connection check · turn off Wi-Fi, then open a webpage
Check your network and that the QR code is clear, and confirm the eSIM is not already on the phone. Do not keep deleting and reinstalling. Contact support if it still fails.
Confirm you are in a covered destination, the plan is valid, and data is not used up. Check the eSIM switch, data line, and roaming. Try airplane mode or a restart.
It is usually set automatically. Only fill it in if your order requires it or you cannot get data, using the values from the order or support. Do not guess APN, username, or password.
You can turn off the travel eSIM and switch data back to your primary SIM. Do not delete an eSIM you still need. Turning the line off does not pause the plan validity.
Have your order number, device model, OS version, country/region, and a screenshot of the error ready.
Use official AirZlink support only. Do not share the full QR code or activation code in public.
Contact AirZlink support → support@airzlink.com